Using nuxt-auth-utils to manage API tokens

Hey, I've been playing around with nuxt a lot lately and in particular to start creating an application to track my Youtube channel
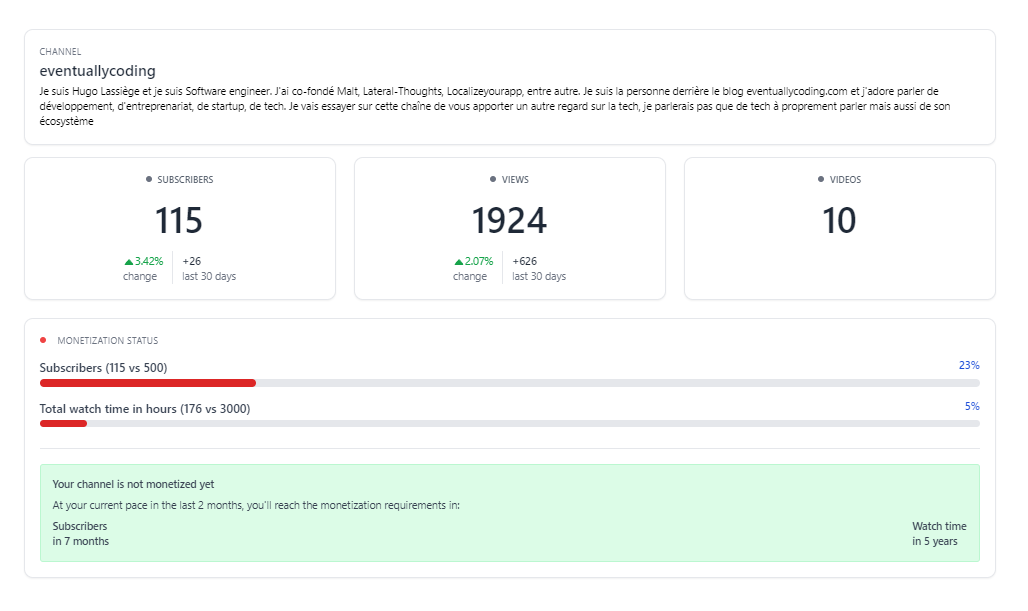
The YouTube studio is pretty good, but I find it lacking in certain analyses. Here's some of what I've been able to do so far:
For this application, I had to use the YouTube API, so it requires authentication and api refresh token. I'll show you how.
The authentication flow
My authentication flow should be as follows:
- the user logs in
- he then arrives at a page asking him to select a YouTube channel
- I store the access tokens and then call the YouTube API
This is a relatively standard process for an API. In many cases, you're given an API key and that's it.
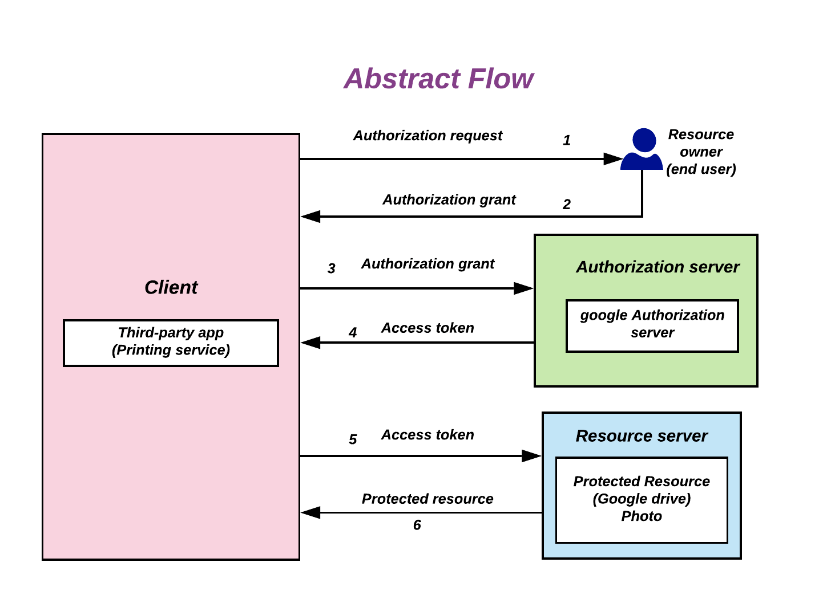
With YouTube, however, you'll be using the Oauth protocol. This protocol allows your user to log in via an external "Authorization server". This authorization server will authorize access and provide you with an access token in return. This access token can be used in all subsequent API calls.
Let's take a closer look at the implementation.
Nuxt-auth-utils
With Nuxt, I tested these options:
- Nuxt-auth in principle the official module, but it's not yet ready for Nuxt 3
- Nuxt-auth-sidebase, I haven't managed to use it to retrieve access tokens.
- Nuxt-supabase, I couldn't use it to retrieve access token either. And I was a bit annoyed to have to use a SAAS to manage my users.
Unfortunately, I didn't get anywhere with these 3 tools. And then Sebastien Chopin redirected me to nuxt-auth-utils.
And, this time, it worked. So this is the solution I'd like you to discover.
Setting up
(the doc is already written on the project's github, but I'll give you part of it here).
The first thing to do, of course, is to install the dependencies:
npm install --save-dev nuxt-auth-utils
then add the module:
export default defineNuxtConfig({
  modules: [
    nuxt-auth-utils
  ]
})
Next, you need to create an API identifier on the Google console. I'll spare you this part and refer you to the official doc
the doc page is about the google ads api, but, who cares, it's the same principle, just make sure you activate the api you're interested in and not the google ads one if it doesn't interest you.
After this step, you should have a client_id and a client_secret. These two values should be placed in an .env file at the root of your project.
NUXT_SESSION_PASSWORD=password-with-at-least-32-characters

NUXT_OAUTH_GOOGLE_CLIENT_ID=YOUR_CLIENT_ID
NUXT_OAUTH_GOOGLE_CLIENT_SECRET=YOUR_CLIENT_SECRET
Configure login window
Once everything is in place, you can create a page: index.vue, which contains the login page.
<template>
    <div v-if="!loggedIn">
        <main >
            <a href="/api/auth/googlelogin" type="button">
                Sign in with Google
            </a>
        </main>
    </div>
</template>
<script setup lang="ts">
// Get the user session from nuxt-auth-utils
const { loggedIn } = useUserSession()

// if the user is already logged, redirect the user to /dashboard
if (loggedIn.value) {
    navigateTo('/dashboard')
}
</script>
The link will trigger the authentication flow. Obviously, to do this, you need to have created a handler.
This is the server/api/auth/googlelogin.get.ts file.
import {setUserSession, oauth} from "#imports";

export default oauth.googleEventHandler({
    async onSuccess(event, { user, tokens }) {

        // Optionally : find if the user with this email already exists in your database
        // if not, create the user
        // .....

        await setUserSession(event, {
            user: {
                login: user.name,
                email: user.email,
                loggedInAt: new Date().toISOString(),
            },
        })
        return sendRedirect(event, '/channel')
    },
    onError(event, error) {
        return sendRedirect(event, '/')
    },
})
If successful, the user will be redirected to the channel page. In my case, we'll ask the user to choose the Youtube channel to connect to his account.
<template>

    <a href="/api/auth/google" type="button">
        Choose channel to join
    </a>

</template>
<script setup lang="ts">
// this page is protected
definePageMeta({
        middleware: 'auth',
    }
)

</script>
You'll note here that my page uses middleware. I don't want anyone to be able to access this page without being logged in first. In this particular example, this is of little importance, but my application goes a little further than the example I'm showing you here.
Here's the code for this middleware, which is really nothing out of the ordinary.
import {navigateTo, defineNuxtRouteMiddleware, useUserSession} from "#imports";

export default defineNuxtRouteMiddleware(async () => {
    const { loggedIn } = useUserSession()
    if (!loggedIn.value) {
        return navigateTo("/");
    }
})
Finally, let's take a look at the code we're really interested in: the second login handler:
import {setUserSession, oauth} from '#imports

export default oauth.googleEventHandler({
    config: {
        scope: ['openid', 'email', 'profile', 'https://www.googleapis.com/auth/youtube'],
        authorizationParams: {
            access_type: 'offline',
        }
    },
    async onSuccess(event, {user, tokens}) {
        const session = await requireUserSession(event)

        // Optional, store the token in database
        // ...
        // Tokens contains access_token AND refresh_token

        await setUserSession(event, {
            user: {
                login: session.user.login,
                email: session.user.email,
                loggedInAt: session.user.loggedInAt
            },
        })
        return sendRedirect(event, '/dashboard')
    },
    // Optional, will return a json error and 401 status code by default
    onError(event, error) {
        console.error('Google OAuth error:', error)
        return sendRedirect(event, '/')
    },
})
This code is interesting for several reasons:
    config: {
        scope: ['openid', 'email', 'profile', 'https://www.googleapis.com/auth/youtube'],
        authorizationParams: {
            access_type: 'offline',
        }
    },
This block configures the scopes you'll request when exchanging with Google. Note 'https://www.googleapis.com/auth/youtube', which will trigger the youtube channel selection screen. But you may need the drive access API, or any other Google API.
Last but not least, we require offline access. This means we'll receive not only an access_token, but also a refresh_token.
The refresh token
It's important to understand that when the google authent is returned. The onSuccess returns tokens to you, but these tokens have a limited lifetime.
In other words, even if your nuxt session is still valid, the access token may have expired. A Google token often expires after an hour.
At that point, if you call an API with this token, you'll get a 401.
So you need to use the refresh token to request a new access token if it's no longer valid.
async function getAccessToken(channelId: string) {

    const token = await getTokenFromDb(channelId)

    if (token && token.expiresAt && new Date(token.expiresAt) > new Date()) {
        return token.accessToken
    }

    // else, we have to renew the token
    else {
        const refreshToken = token.refreshToken
        const response = await fetch('https://oauth2.googleapis.com/token', {
            method: 'POST',
            headers: {
                'Content-Type': 'application/x-www-form-urlencoded'
            },
            body: `client_id=${process.env.NUXT_OAUTH_GOOGLE_CLIENT_ID}&client_secret=${process.env.NUXT_OAUTH_GOOGLE_CLIENT_SECRET}&refresh_token=${refreshToken}&grant_type=refresh_token`
        })
        const tokens = await response.json() as { access_token: string, refresh_token: string }
        await updateToken(tokens.access_token, tokens.refresh_token, channelId)
        return tokens.access_token
    }
}
The call to getAccessToken will read the token stored in the database, and its expiry date. The expiry date has been set to 1h minus 5 minutes to anticipate its expiration.
If the token has expired, we'll request a new token WITH the refresh_token and we can update the database with this new token.
And that's all for today. Don't hesitate to ask me questions in the comments or let me know if you have any feedback on this implementation.